
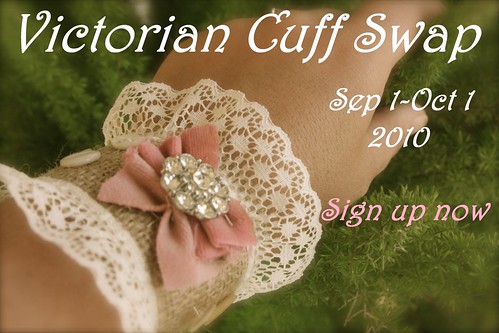
Cuff Tutorial
 "
"
" Ok this is not the prettiest cuff I can make but it was a quick one I put together. They are so easy peasy to make.
1. Measure your wrist size and add a half an inch.
2. Choose a couple of fabrics for the cuff and what ever you want to embellish with.
3. Cut the fabric the length of your wrist plus a 1/2 inch. I like mine only an inch and 1/2 wide because I like to embellish so much.
1. Measure your wrist size and add a half an inch.
2. Choose a couple of fabrics for the cuff and what ever you want to embellish with.
3. Cut the fabric the length of your wrist plus a 1/2 inch. I like mine only an inch and 1/2 wide because I like to embellish so much.

4. I chose burlap and a soft cotton to make as the cuff. I then sewed them together on my sewing machine but you could easily do by hand.

5. I chose to make a ruffle with a vintage piece of velvet.

6. I then sewed a couple of pieces of lace on the top and bottom of the cuff. I hand stitched all the buttons and ruffle onto the cuff.


7. I then hand stitched some snaps that I bought at walmart onto the cuff. Now my friend Ellene McClay (who makes incredible cuffs and has joined our swap!) said you can also use a button on one end and a small pony tail holder on the other side.

8. I covered the outside snaps with a little velvet bow.

Voila! You have an easy peasy cuff:)

Ok this one is more my style and it was easy too.
1. I cut out a cute embroidered patch off my daughter jeans and a strip off my sons jeans to be be the base of the cuff.

2. I then channeled a little Ruth Rae and zig zag stitched on scrap silk and just made it look like a mess. (which was my goal!)

3. I made a flower for the center. I stitched on a few beads and lace. I also stamped "art girl" (which I bought at Red Lead) on a piece of cotton and attached it with a few French knots.

Thank you for all of you who have joined our swap. It is not to late to join!!!
Grab our button if you haven't yet:)


Okay, Shelley, I'm IN!!!!
ReplyDeletexxoo
Hi Shelley!
ReplyDeleteNot sure if my first post went through. Please count me in for this Victorian Cuff Swap. I have a big passion for all things that are from the Victorian era. So this will be fun! I will send my info asap. Also thanks a million for visiting my blog. It was so nice of you. I am off to post about the swap on my blog and also click and follow your blog. ;-)
xO
Janet Bernasconi
Janets Creative Pillows
Love this! I wll post a tute this week too....this is going to be so FAB!!!!!!!!
ReplyDeleteHey thais great Shelley! Thank you art girl!
ReplyDeleteThanks for the great tutorial Shelley!! I am gonna have to give this a try one of these days!!
ReplyDeleteWhat a great swap idea. I just love how you girls come up with these wonderful swaps! Nice tutorials too!
ReplyDeleteHope you're having a great week.
Holly
oh thanks for your sweet mention! I will try to add a link to a picture of the button and loop closure in case anyone wants to see - I mainly did it so it would be a bit adjustable for different wrist sizes.
ReplyDeleteThis will be so fun to see all the different cuffs people come up with!
I am signed up for the swap and excited to create a new one :)
hope this link works:
http://www.etsy.com/transaction/12228281
Shelley
ReplyDeleteWe just hit 100 followers on Etsy and you were one of the first.We are going to have a drawing on Monday to thank all of our followers and give away a special gift box of things that the winner would like ...we will talk to them first. We will be drawing on Monday and, of course, you will be included!
Just wanted you to know...Thank you, Shelley!
Hugs,
Kat and Suz
katsui
http://katsuijewelry.blogspot.com
sssshhhhhhhelley! i love it! u r swappn'. and actually hosting the swap. good times.
ReplyDeletehope u have fun in colorado this weekend. miss y'all! & for the next kim event next year...moulin rouge is the theme. u have a full year to make it happen.
kit sweetheart!!!
you did an amazing job, and thank you for the great tutorial Shelley! just gorgeous!!!
ReplyDeleteBeautiful even if you say it's not your best. I love it! Count me in sweets! Can't wait! xo
ReplyDeleteShelley,
ReplyDeleteDumb me. I meant our blog. You did a good tutorial here. Why am I afraid of my machine? Do I need a psychologist?
Hugs,
Suz
Thank you for such a fun tutorial - your cuffs are amazing!! I can't wait to play around with some vintage trims I have been saving. *HUGS* Heidi
ReplyDeleteHi Shelley!
ReplyDeleteBeautiful cuffs and nice tute!
Smiles-
Melissa
The cuffs are so beautiful! I love that they are soft and feminine. The perfect fashionista accesstory. Thanks so much for sharing and for the tutorial.
ReplyDeleteYou crack me up girl! Thanks for the sweet comments. I will for sure go buy a walking foot now! Love the cuff swap - can't wait to see all the pretties that will be made!
ReplyDeleteI've had fabric and embellishments all lined up waiting to be made into cuffs, but I wasn't sure how to do the closure. Thanks for the tutorial, I'm going to have some finished cuffs on my wrists this weekend!
ReplyDeleteLove it!!
ReplyDeleteWhat gorgeous cuffs! You are so creative and clever! I am happy I found your blog, will be checking back to see what other pretties are in store for us to feast our eyes on!
ReplyDeleteNancy
I love the cuffs! Got to try this one, thanks so much!
ReplyDeleteBlessings'
Catlyn